Introduction
Site-to-site Virtual Private Network (VPN) is used to establish connections between different locations of companies, amongst others. This way the different locations can exchange data with each other through a secure connection. In Azure, Site-to-Site VPN is used to establish connections between the Azure tenant and the on-premises environment. Making use of the Site-to-Site VPN connection it is possible to create one large network. This is called a hybrid environment.
Before creating a site-to-site VPN make sure that the VPN endpoint device will support the connection with Azure and a that public IPv4 IP address is available. To check if the VPN device is supported, please see the following website: https://azure.microsoft.com/nl-nl/documentation/articles/vpn-gateway-about-vpn-devices/
This blogpost will focus on Azure Resource Manager portal and contains six steps that should be performed in sequence. Please note that the configuration of the VPN endpoint device located on-premises will not be discussed in this blogpost. The following steps should be taken to create a Site-to-Site VPN in Azure:
- Step 1. Create a Resource Group.
- Step 2. Create a Virtual Network in Azure.
- Step 3. Create a Virtual Network Gateway.
- Step 4. Create a Local Network Gateway.
- Step 5. Create a VPN connection.
- Step 6. Check if the connection is working.
Step 1. Create a Resource Group
Virtual machines, IP addresses, load balancers, virtual network gateways, local network gateways, virtual networks etc. are all components that are usually related and may depend on each other. It is possible to make use of Azure Resource Manager Groups and combine these different components into a single or multiple resource group(s). This will make management and maintenance of these components a lot easier.
In order to create a resource group please login to the Azure portal at https://portal.azure.com. The “resource groups” icon is accessible on the left side of the portal (Figure 1).

Figure 1. Azure resource groups.
When the resource groups are not shown, click on “Browse” and search for resource groups, then mark them as favorite. From this moment on they will appear in the list.
In this example the goal is the create a VPN connection in Azure. First a resource group for the Virtual Network should be created. To do so click on the “Resource groups”, select “Add”, fill out the required fields and select “Create” (Figure 2).

![]()
Figure 2. Create Resource Group ARM.
Step 2. Create a Virtual Network in Azure
The second step is to create a virtual network in Azure. It is very important to determine in advance which subnets will be used. The selected subnet in Azure should not overlap with the subnets used on-premises.
In the Azure portal select “Virtual networks”. Once again if the item is not shown, click on “Browse”, search for virtual networks and mark them as favorite.
Create a virtual network by clicking “Add”. Fill out the required fields and click on “Create” (Figure 3).

![]()
Figure 3. Create a virtual network.
If desired, it is possible to add multiple subnets, for example one for the front-end servers and one for the back-end servers.
Step 3. Create a Virtual Network Gateway (Azure)
The virtual network gateway is the gateway on the Azure end, so sending and receiving data will go through this gateway. In this step the purpose of the Site-to-Site VPN should be considered. Depending on the requirements a choice can be made between route-based and policy-based VPN types.
- Route based: (Dynamic routing) will support multiple VPN connections and uses IKEv2.
- Policy Based: (Static routing) supports a single VPN connection and works with IKEv1.
*When a virtual network gateway is re-created it will come with a new public IP address from Microsoft. Keep in mind to change the (old) IP address in the VPN endpoint device that is used on-premises.
In the Azure portal select “Virtual networks gateways” and click “Add”. Fill out the required fields and click on “Create” (Figure 4).
*Provisioning a virtual network can take up to 45 minutes.
In the next step fill out the information provided below and shown in detail in Figure 4.
- Virtual network: Select the virtual network that has been created in step 2.
- Public IP addresses: Select Azure’s public IP address.
- Gateway type: Select VPN.
- VPN type: Select Route-based.

![]()
Figure 4. Create virtual network gateway.
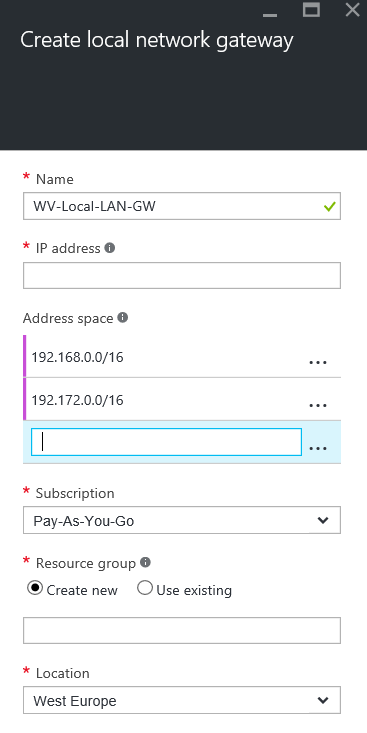
Step 4. Create a Local Network Gateway (on-premises)
The local network gateway is the gateway that will be configured with the details of the on-premises network. The following information must be verified:
- IP addresses: This must be the IP address of the VPN endpoint device located on-premises.
- Address space: All the address spaces that’s being used on-premises.
*The address space used on-premises may have absolutely no overlap with the address space in Azure!
In the Azure portal select “Local networks gateways” and click “Add”. Next, fill out the required fields and click on “Create” (Figure 5).
![]()
Figure 5. Create local network gateway.
When creating multiple VPN connections, for example to different locations and/or companies, this step should be performed for each connection.
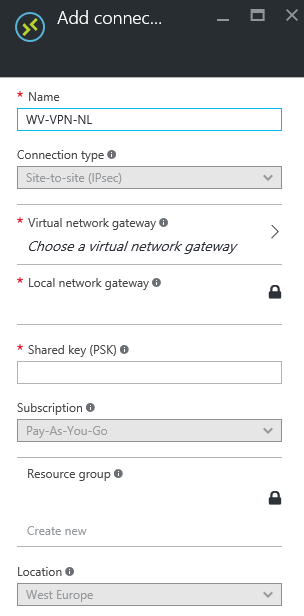
Step 5. Create a VPN connection
Once the local network is created a new connection can be added. This step can be executed directly after the local network gateway has been created. Click on “Connections” and click “Add”. Fill out the required fields and click on “OK” (Figure 6).
In the next step fill out the information provided below and shown in detail in Figure 6.
- Virtual network gateway: Select the virtual network gateway that was created in step 3.
- Local network gateway: This option cannot be changed. The VPN connection must be added to the local network gateway that was created in step 4.
- Shared key (PSK): This key will be used for encryption for the connection. Type in a random mix of letters and numbers (do not use special characters in the key). Make sure that this exact key will be used for the configuration of the VPN connection on-premises.
![]()
Figure 6. Add Connection configuration.
Step 6. Check if the connection is working
The VPN connection needs to be successfully configured in both Azure and the VPN endpoint device on-premises. Once the configuration on both sides is finished, it is possible to check the connection status.
Go to “Local network gateway” and click on the connection. The local network gateway settings will be visible, click on “Connections” and select the connection. The information displayed here is showing the current connection status and data traffic, see Figure 7 for details. It is also possible to see the connection properties of the VPN connection as presented in Figure 8.
To open directly the VPN connections, click on “Browse” in the Azure Portal, search for connections and mark them as favorite.
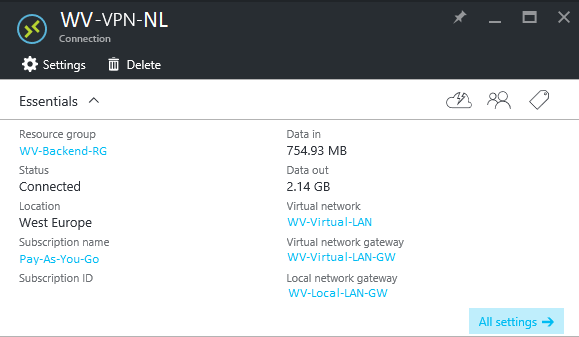
Figure 7. VPN Connection details.

Figure 8. Properties of the configured VPN connection.
If executed all steps as described above, a successful VPN connection between the on-premises environment and the Azure environment has been established.

thanks alot of information keren banget