Protect your data with Microsoft Intune – Part II

Introduction

In the previous blog post the implementation and configuration of Intune on Windows devices was explained. In this part of the blog post I will describe the possibilities that Intune has, regarding to Mobile Application Management (MAM) and Mobile Device Management on Apple devices, including modern authentication.

Like Part I of this blog post, a fictitious scenario was created in which a company is working fully in the Microsoft cloud. This company wants to give their employees not only internally but also externally access to company data, regardless of the device their using. Of course, the company wants to ensure that company data can only be consulted if the devices are secure and meet the company’s security policy. For example, it needs to be prevented that a jailbroken device and/or native email clients, that does not support modern authentication, can access company data.

This blog post will describe the following steps:

Apple configuration in Intune

  • Installation of the Apple push certificate

Configuration and compliance settings

  • Configure the device compliancy settings
  • Configure the iOS device compliancy policies
  • Create conditional access policies
  • Create application protection policies

How does the end user experience look like?

  • User experience with the native email client
  • User experience with the Outlook app
  • Installation of the Intune Company Portal App

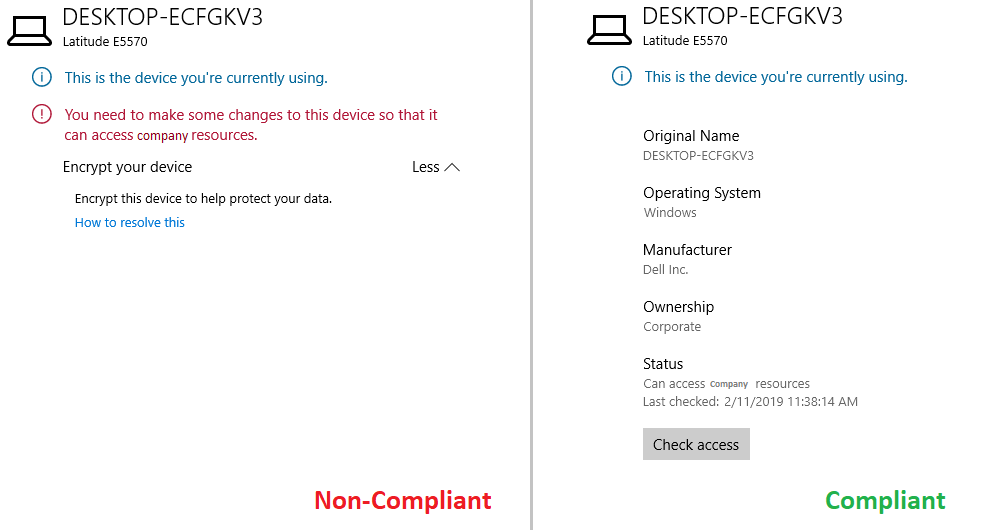
After a successful implementation and configuration of Intune on Apple devices, the result presented in figure 1 is derived, i.e. denying or granting access to company data when an employee is trying to get hold of these data by using, respectively, a non-compliant or compliant device.

Figure 1.  User experience when accessing data on a Non-Compliant Apple device (left) and on a compliant Apple device (right).

Apple configuration in Intune

Before one can configure device compliance, compliance policies and conditional access policies in Intune, the Apple Push Certificate configuration must be setup. Please see the detailed steps below.

Apple Push Certificate

The Apple push certificate is required when managing mobile iOS devices. Keep in mind that an Apple ID is required for this configuration. Open the Azure Portal -> Intune -> Device Enrollment -> Apple Enrollment -> Apple MDM Push certificate (figure 2).

Figure 2. Configuration of the Apple Push Certificate.

Create the Intune signing request (IntuneCSR) and download this file onto the pc and select “Download your CSR“. Next click on “Create your MDM push certificate” and enter the Apple ID to create an Apple MDM push certificate. In the Apple Push Certificates Portal select “Choose File” and upload the IntuneCSR displayed in figure 3 and 4.

Figure 3. Download the Intune certificate signing request and create an Apple MDM push certificate.

Figure 4. Upload the certificate signing request.

When the file is valid the certificate can be downloaded (figure 5).

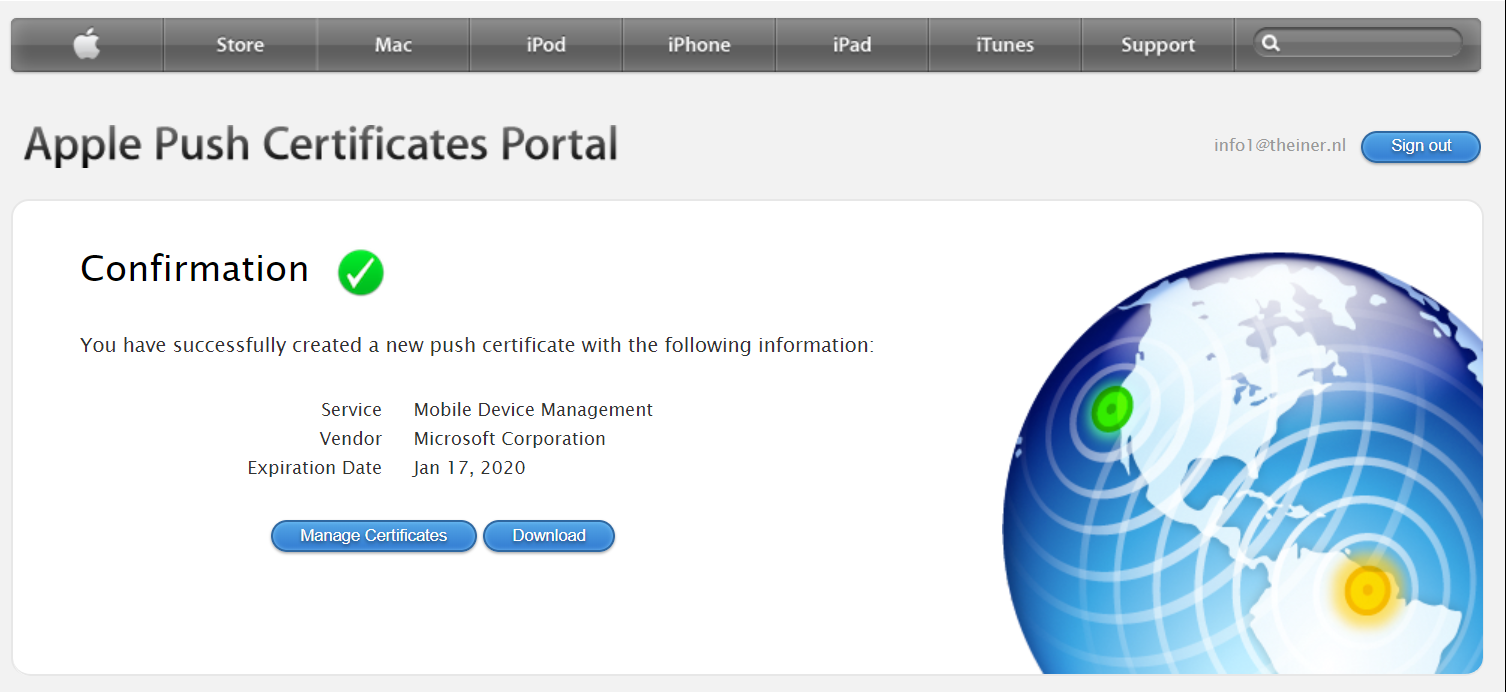
Figure 5. Download the Apple Push Certificate.

Next upload the downloaded Apple MDM push certificate in the portal, please see figure 6, and click on “Upload”.

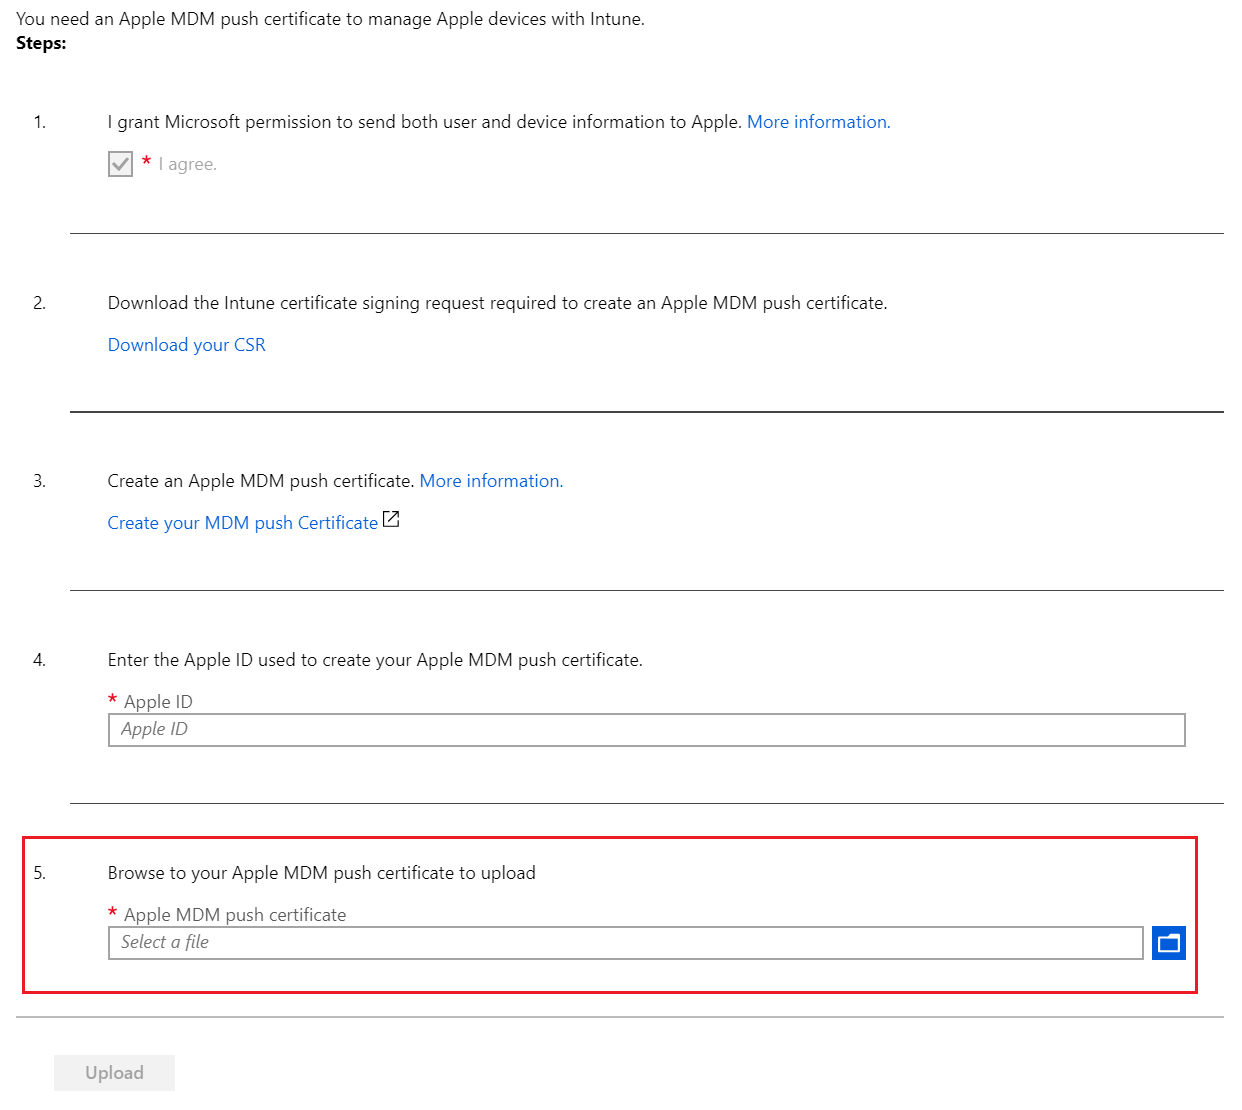
Figure 6. Upload the MDM Push Certificate in the Intune portal.

After the configuration has been successfully performed, make sure that the status of the Push Certificate is “Active“, see figure 7.

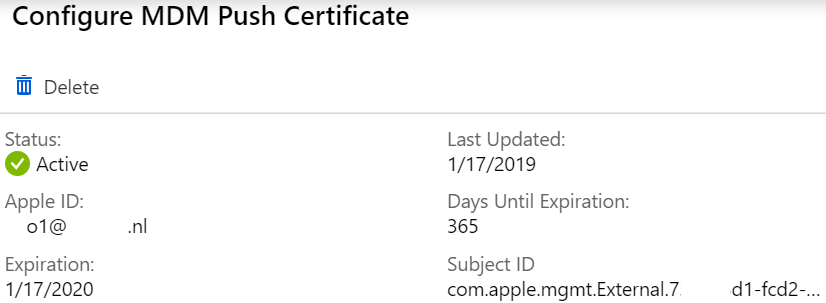
Figure 7. Status of the MDM Push Certificate.

Important! Keep in mind that the certificate needs to be renewed once a year.

Configuration and compliance settings

Device Compliance Settings

For the configuration regarding to the Device Compliancy settings please see my previous post, Protect your data with Microsoft Intune – Part I: https://woutervisser.net/2019/02/13/protect-your-data-with-microsoft-intune-part-i/

iOS Device Compliancy Policies

Device compliance policies are used to ensure that the device which is used to access company data is compliant to the company security policy. If the device does not comply to this policy, access to company data can be prevented. In the current example a device compliancy policy will be created for iOS.

On the iOS devices the policy is configured in a way that access from a jailbroken device will be blocked, the minimum iOS version must be 11.1.3, the user must use a password to unlock mobile device and the use of simple passwords is not allowed. To do this open the Azure Portal -> Intune -> Device Compliance-> Policies -> Create Policy (figure 8).

Figure 8. Create Device Compliance Policy.

Give the policy a name and select “iOS” as the platform. The next configuration of the device compliancy policy is the email setting. If this setting is set to “Require”, then devices that do not have an email profile managed by Intune will be considered as non-compliant. In this case this feature is not used. Therefore, make sure that it is set to “Not configured”. To do this open the Settings -> Email (figure 9).

Figure 9. Device Compliancy Policy – Settings – Email.

In the fictional scenario it must be prevented that jailbroken devices can have access to company data. Therefore, the configuration will block such devices. To configure this setting go to Device Health and select “Block” (jailbroken devices). The “Require the device to be at or under the Device Threat Level” setting is in this case set to “Not Configured” (figure 10).

If one is willing to use the Device Threat Level functionality, it must be configured in relation to the threat Defense services. Devices which then will exceed the threat level will get marked as non-compliant (this compliance check is only supported for devices with iOS 8.0 and above).

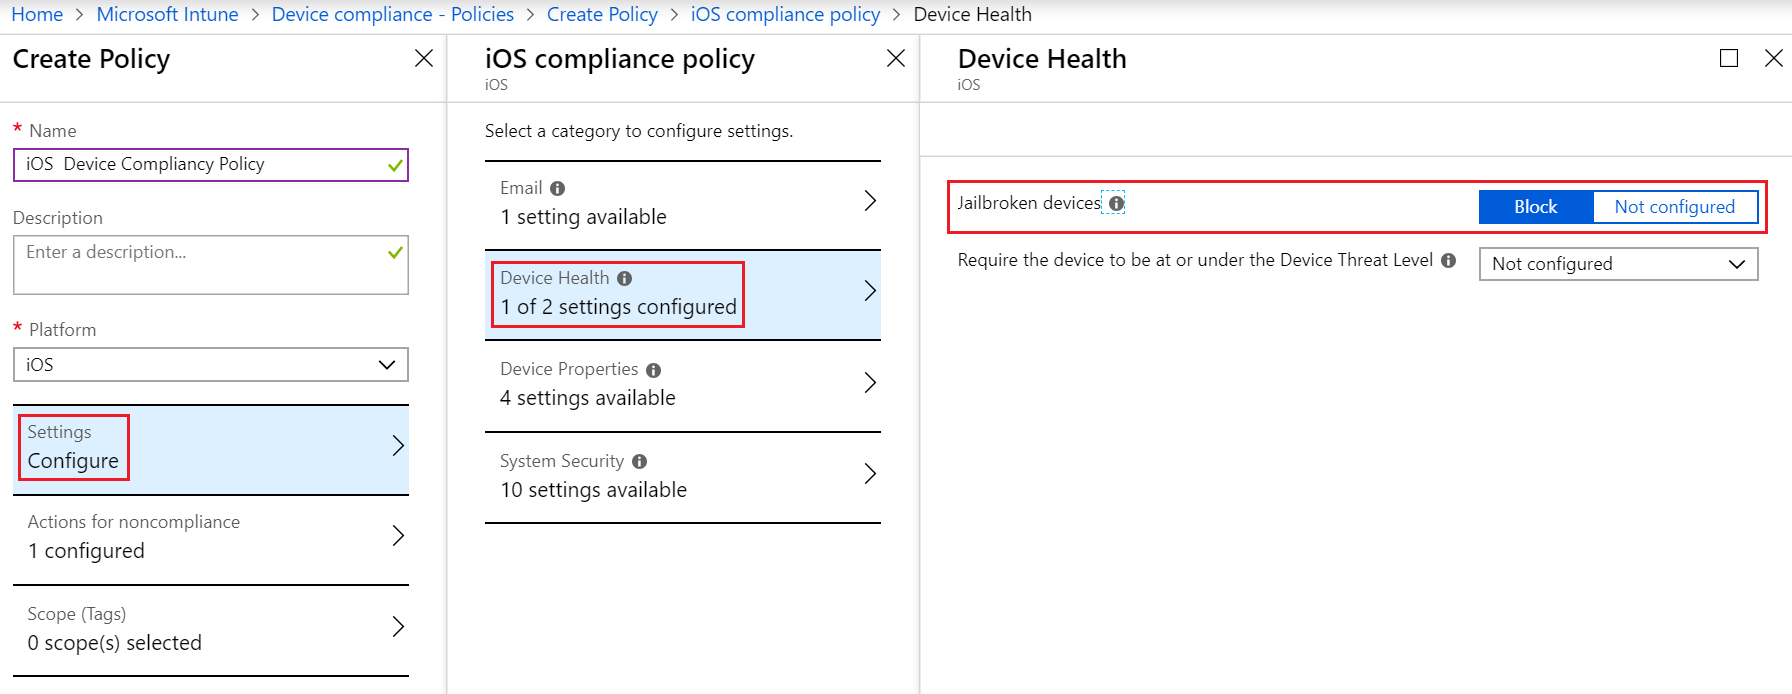
Figure 10. Device Compliancy Policy – Settings – Device Health.

Under the device properties configuration, it is possible to select the minimum and maximum iOS version. Also, the minimum and maximum iOS build version can be configured. In this case only a minimum iOS version of 11.1.3 Devices is required and devices with a lower iOS version will not be marked as compliant. To do so open the Device Properties (figure 11).

Figure 11. Device Compliancy Policy – Settings – Device Properties.

The security configuration that will apply can be configured under System Security. A various set of settings such as block simple passwords, password expiration, minimum password length and password type can be configured by the System Security. In this case the settings were configured as follows; a password is required to unlock mobile devices, simple passwords will be blocked, minimum password length is 6, password type is numeric, the password expiration days is set to 90 and the number of previous passwords to prevent reuse is set to 5. These settings are shown in figure 12.

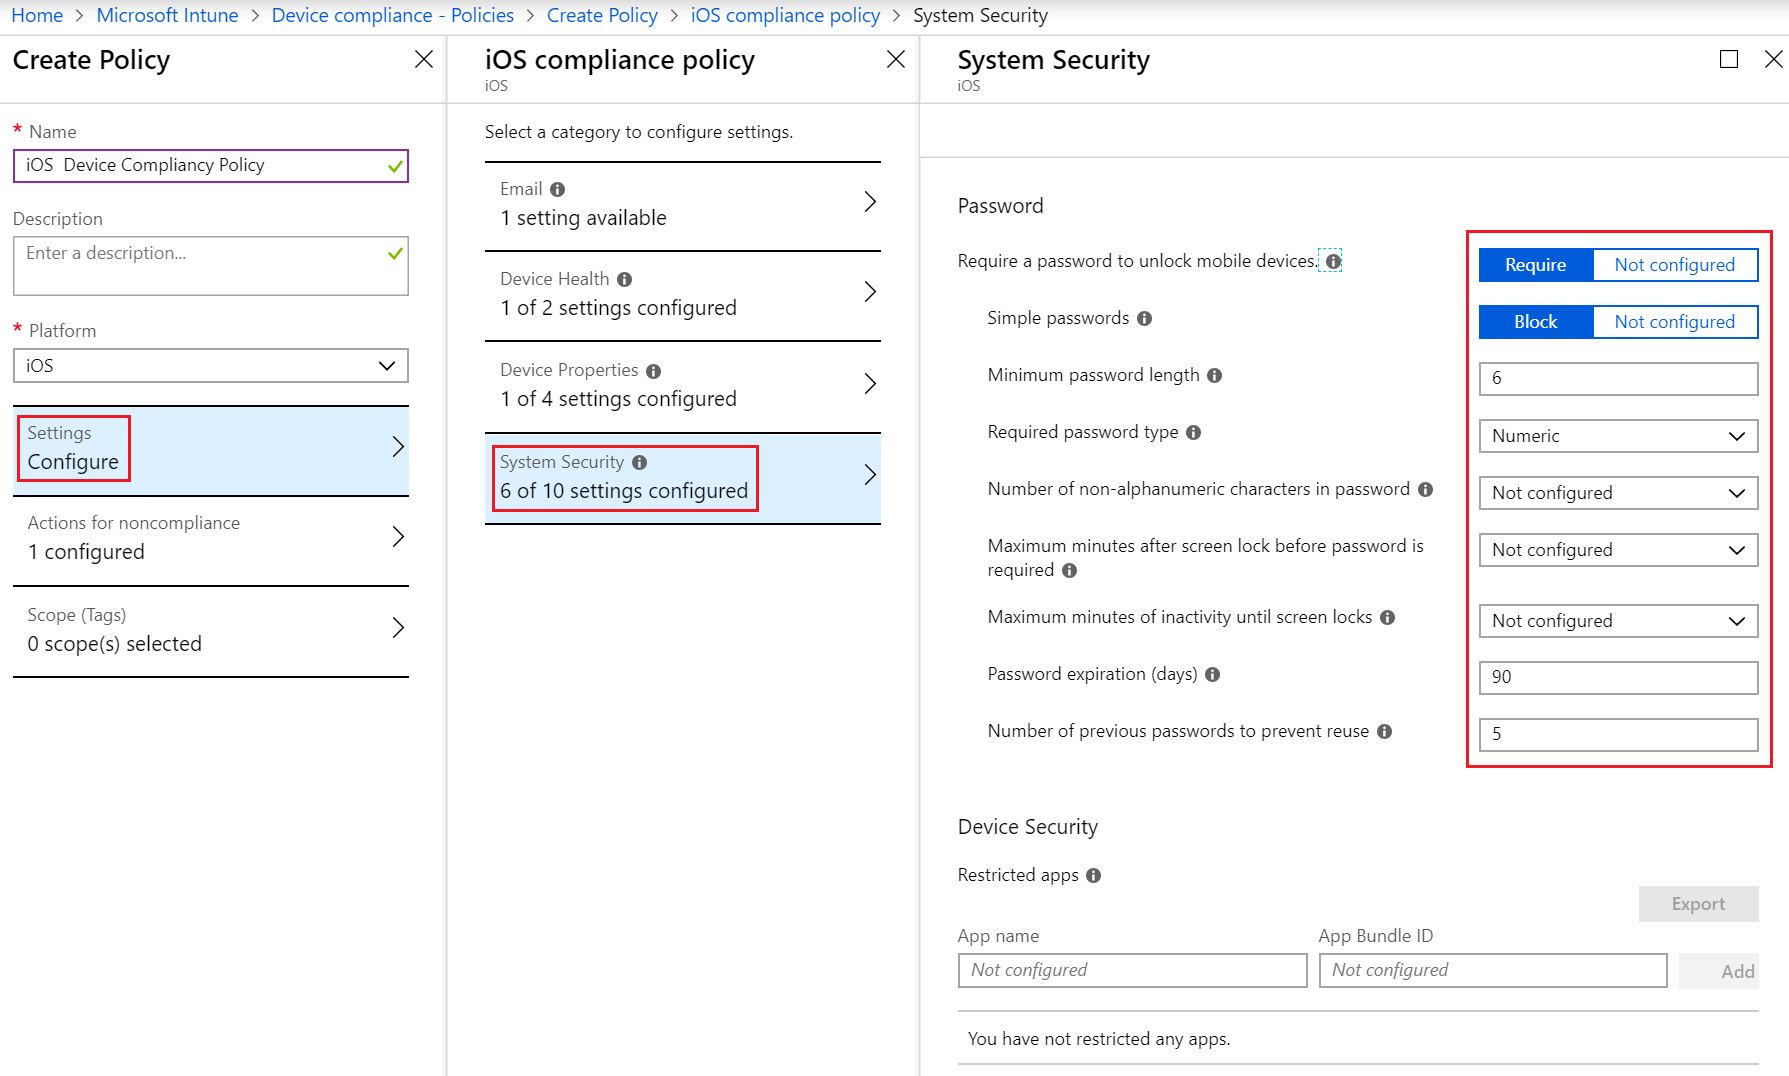
Figure 12. Device Compliancy Policy – Settings – System Security.

Also, two actions can be configured to inform an employee when his/her device is not compliant. In this fictious scenario, the employee will be notified via an email. Therefore, notification templates must be created. The first notification will be sent 24 hours after non-compliance. In this notification the user will be notified that actions must be taken to make the device compliant within three days. After three days the device will be automatically marked as non-compliant. To do so open the Actions for noncompliance -> Add (figure 13). The required steps for making notification templates can be found in my previous blog: Protect your data with Microsoft Intune – Part I: https://woutervisser.net/2019/02/13/protect-your-data-with-microsoft-intune-part-i/

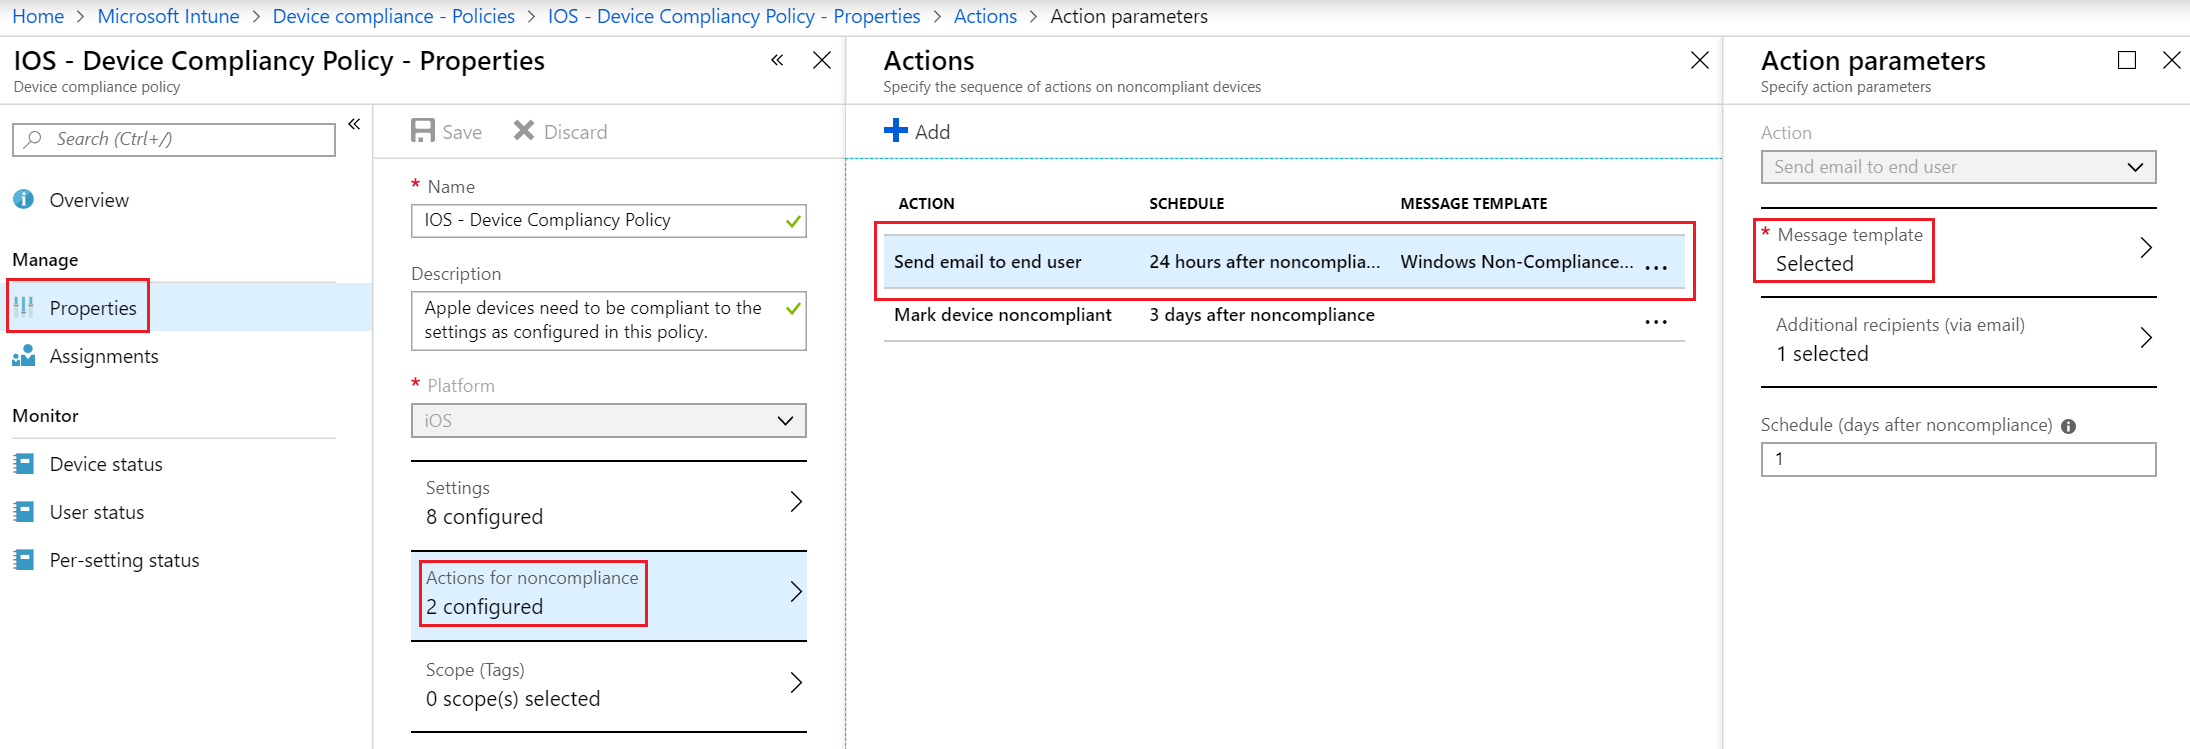
Figure 13. Device Compliancy Policy – Actions for noncompliance.

Click “OK” and then “Create” to create the policy. The last step of this configuration is to assign the device compliancy policy to the correct group. To do so open the Azure Portal -> Intune -> Device Compliance-> Policies -> IOS Device Compliancy Policy – Assignments (figure 14).

Figure 14. Device Compliancy Policy – Assignments.

Conditional Access Policies

Conditional access policies will be used to control if devices and apps are granted access to company data such as email. In the fictional scenario a device must be compliant to the conditional access policies before granting access to company data.

Create a Conditional Access Policy for iOS

In the Device compliance policy, a few settings are configured to which the device must comply before access to company resources is provided. An example of a setting to which the device should comply is that the device must have minimal iOS 11.1.3 installed. In the conditional access policy, it is configured that the device may access company data, but only if it meets the configured conditional access policy requirements. In the conditional access policy, it can be configured that only approved client applications, such as the Outlook app, may access company data. To create the conditional access policy, go the Azure Portal -> Intune -> Conditional Access -> New Policy (figure 15).

Figure 15. Create new Conditional Access Policy.

Give the policy a name and Select Users and Groups -> select Users and groups then select the Azure AD Group to which this policy applies. In this case no groups are excluded (figure 16).

Figure 16. Conditional Access Policy – Select Users and groups.

In the next step it is possible to select which cloud applications one wants to include or exclude from the conditional access policy. In this fictious scenario, all cloud applications are selected without excluding any apps. This means that conditional access is applied to all available cloud applications. Go to Cloud Apps (figure 17).

Figure 17. Conditional Access Policy – Cloud Apps.

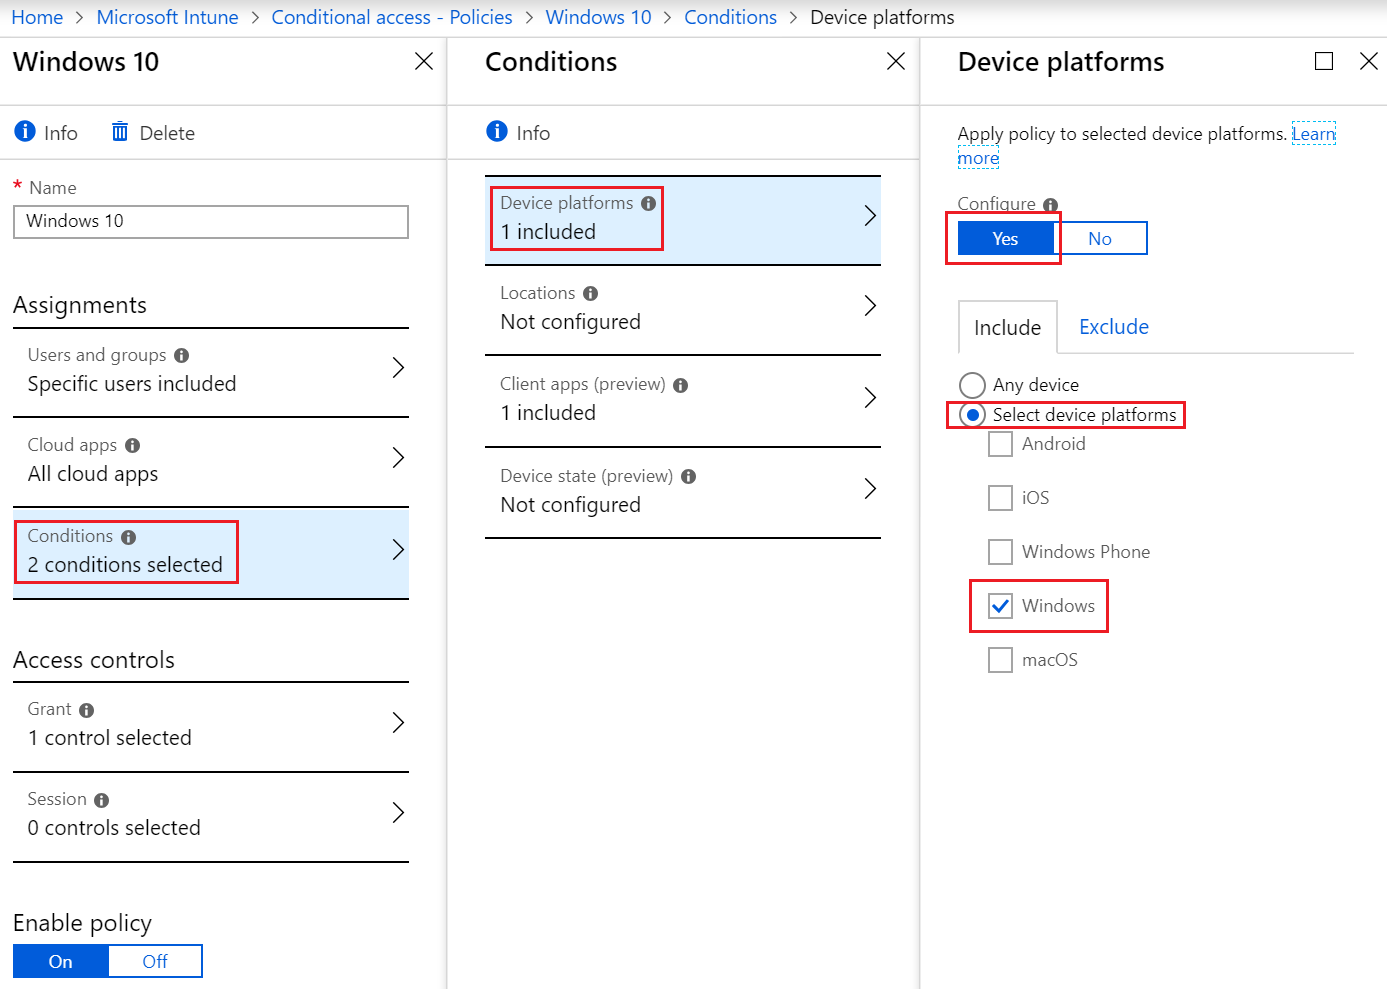
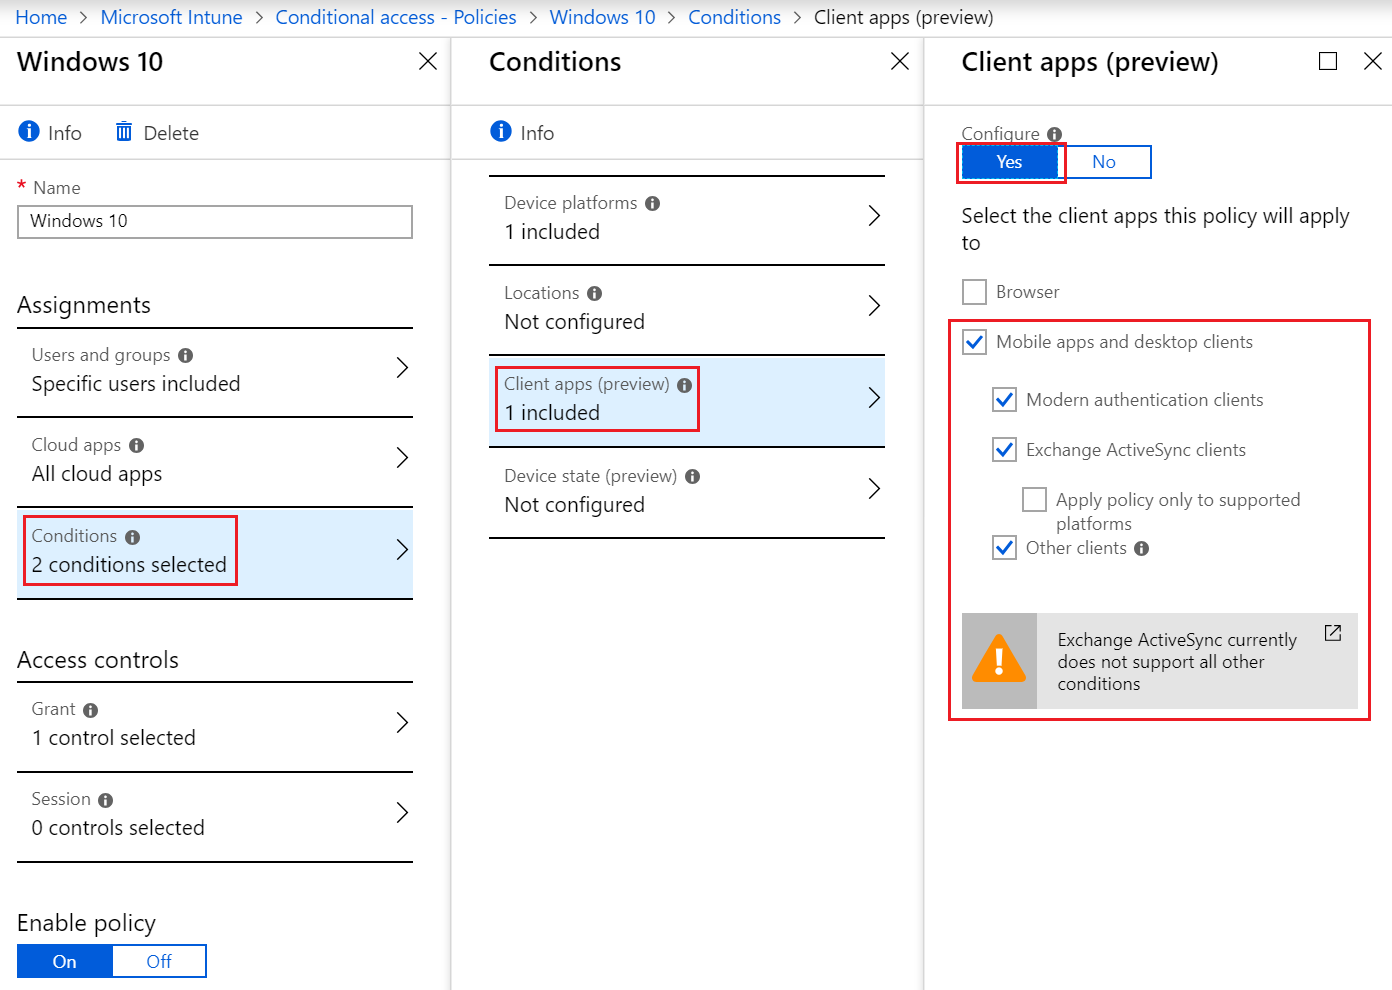
This conditional access policy will be applied to a specific platform, namely iOS. Go to Conditions -> Device Platforms, click configure “Yes”, followed by “Select device platforms” and include only “iOS”, to make this policy specific for Apple iOS devices (no exclusions were made), please see figure 18.

Figure 18. Conditional Access Policy – Conditions – Device Platforms.

In this case no Locations and Device state are configured. Under the Client apps select the client apps to which the policy should apply to as shown in figure 19.

Figure 19. Conditional Access Policy – Conditions – Client apps.

Only compliant Apple devices can get access to company data. Go to Access Controls -> Grant -> Grant access select “Require device to be marked as compliant” and “Require approved client app”. This means that the device must be Intune compliant and the device must use approved client apps. Finally, select “Require all the selected controls”. If the device is non-compliant, the user will be prompted to make the device compliant. Save the configuration and do not forget to enable the policy (figure 20)!

Figure 20. Conditional Access Policy – Conditions – Grant.

Client Application Protection Policies

By using client application protection policies, it is possible to configure protection per application to make these more secure. In this case, for example, it is possible to prevent employees from making backups from their device using iTunes and/or iCloud. In addition, one can also prevent copying data from a certain app or only allow this if the data remains within the approved client applications. It can also be configured that an employee must first enter a code before he/she gains access to the application. Using application protection policies, gives one the opportunity to make (mobile) apps much safer. How that can be configured is explained in the steps below.

Create Application Protection Policy for iOS

Open the Azure Portal -> Intune -> Client Apps -> App Protection Policies -> Create Policy.

Type in the policy name, select iOS as the platform and select the applications that must fall under this policy (figure 21).

Figure 21. Application Protection Policy – Create Policy – Apps.

Next, select Settings -> Data Protection and click on “block” backup Org data to iTunes and iCloud backups, send Org data to other apps “All Apps”, receive data from other apps “All Apps”, save copies of Org data “Block”, allow user to save copies to selected services select “OneDrive for Business” and “SharePoint”, restrict cut, copy and paste between other aps “Policy managed apps with paste in”, encrypt Org data “Require”, sync app with native contacts app “Enable”, printing Org data “Enable” and third party keyboards “Disable” (figure 22).

Figure 22. Application Protection Policy – Create Policy – Settings – Data protection.

Next configure the access requirement settings, select Settings -> Access requirements and configure this as follows; pin for access “Require”, PIN type “Numeric”, simple PIN “Block”, select minimum PIN length “6”, PIN reset after number of days “Yes”, number of days “90” and App PIN when device PIN is set “Enable” (figure 23).

Figure 23. Application Protection Policy – Create Policy – Settings – Access requirements.

The conditional launch settings also contain some access protection features and gives the opportunity to undertake immediate actions in case devices do not meet the given values. Select Settings -> Conditional launch. In this scenario it is configured as follows; minimum OS version “11.1.3” action – “Warn”, max PIN Attempts “5” action – “Reset PIN”, offline grace period “720” (minutes) action – “Block access”, offline grace period “90” (days) action – wipe data and jailbroken/rooted devices action – “Block access” (figure 24).

Figure 24. Application Protection Policy – Create Policy – Settings – Conditional launch.

After the policy is created it is time to assign the policy to the correct group. Open the policy and select Assignments -> Include (figure 25).

Figure 25. Assign the Application Protection Policy to a group.

The result: Accessing company data from an Apple device

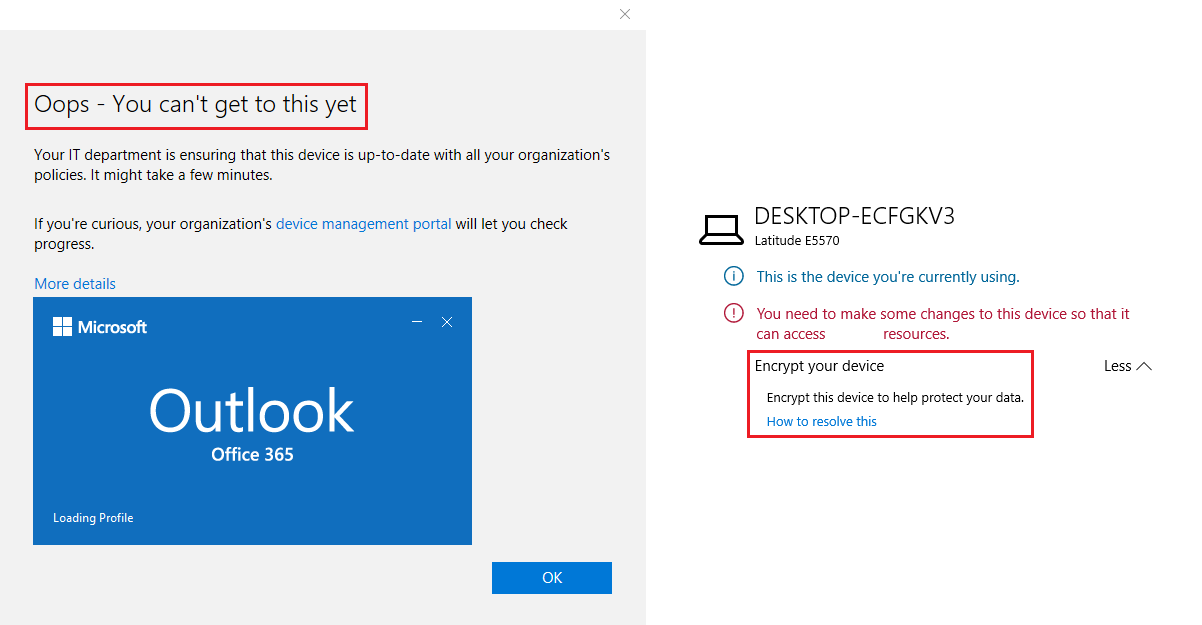
All these configuration steps will ultimately result in denying or granting access to company data from an Apple device. Figure 26 shows the user experience when an employee wants to configure email in the native email client on iOS.

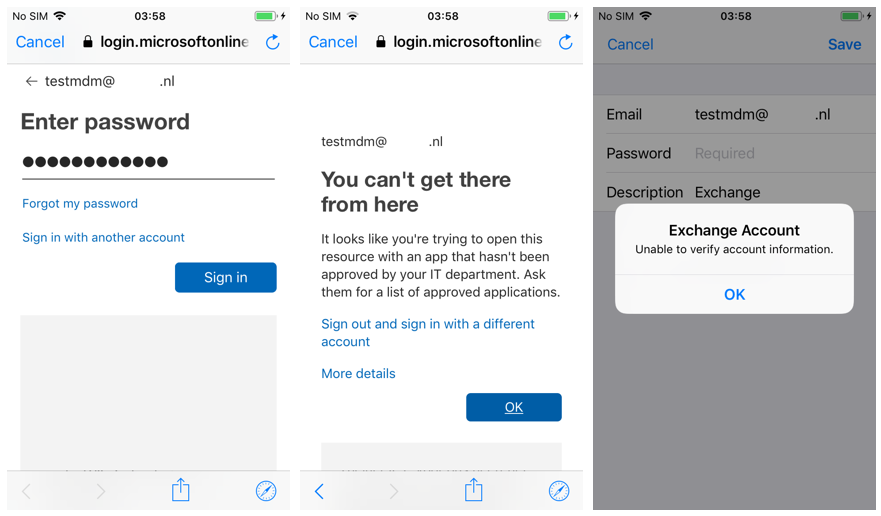
Figure 26. Non-Compliant Apple device and/or with native email client.

As presented in figure 26, the employee cannot successfully configure company email in the native email app on iOS, because the device and/or email client is not allowed to access company resources. To access company resources the employee must make sure that the device is compliant with the polices as configured in this post. Also, the employee needs to make use of the Microsoft Outlook email app. If the device is compliant and the Outlook app is installed, the employee can access company data as shown in figure 27.

Figure 27. Compliant Apple device in combination with the Outlook app.

Installation of the Intune Company Portal App

The configuration of the Company Portal in Intune is described in my previous blog: https://woutervisser.net/2019/02/13/protect-your-data-with-microsoft-intune-part-i/

After completing the configuration of the Company Portal, one has the possibility to use the Company Portal app on iOS. This can be found and downloaded in the Apple Store. The Company Portal app provides the possibility to make apps available for the employees to use. Apps that are pushed from Intune will appear in the Company Portal app of the employee. Please see figure 28 for the installation and signing in to the Company Portal app in iOS. In case the device is fully managed within Intune Mobile Device Management, it is also possible to wipe company data in the event that an employee loses his/her device(s).

Figure 28. Installation of the Company Portal app on iOS.

As previously indicated, in the next blog post I will describe the steps required for the configuration of Intune on Android devices, including conditional access policies.

Protect your data with Microsoft Intune – Part I

Introduction

Microsoft Intune is part of Enterprise Mobility + Security (EMS). Intune is known for its capabilities to manage PC’s, laptops, mobile devices and applications in large and small companies. Working with Microsoft 365, Intune facilitates securing access to applications and company data and keeps data protected, both inside and outside the company network.

Intune is able to determine if a device is compliant to the company’s security policy. If the device is compliant the user is granted access to company data, regardless if this is a corporate device or Bring Your Own Device (BYOD). In case the respective device does not match the company’s security policy, access to company resources such as SharePoint and Outlook can be prevented. These functionalities in combination with Multifactor Authentication (MFA) make Microsoft Intune a very strong and secure solution when making business data available for employees.

In this blog posts more insight will be provided into the possibilities that Intune has, including the difference between Mobile Application Management (MAM) and Mobile Device Management (MDM).

Due to the numerous configuration steps necessary for a successful implementation on Windows, Apple and Android devices the current blog post only focusses on Windows devices. The purpose of this blog post is to accomplish the result shown in figure 1, i.e. accessing company data from either a compliant or a non-compliant Windows 10 device. In the two following blog posts the implementation and configuration of Intune on Apple and Android devices will be explained.

Figure 1. Message when accessing data on a Non-Compliant Windows 10 device left and on a compliant Windows 10 device right

Figure 1.  Message when accessing data on a non-compliant Windows 10 device (left) and on a compliant Windows 10 device (right).

Description of the fictional scenario

To illustrate how company data can be accessed from a compliant or a non-compliant Windows device a fictional scenario was created. This scenario contains the most common functionalities on Windows devices and describes the necessary steps for a successfully implementation of Intune.

In this fictional scenario it is assumed that a company is completely working in the Microsoft cloud and only using cloud applications.

The company intends to provide their employees internal and external access to company data, regardless of the device that is used. Of course, the company wants to ensure that these data can only be consulted if the devices are secure and meet the company’s security policy. For example, it needs to be prevented that company data can be accessed from a non-Bitlocker device or from native email clients, that doesn’t support modern authentication.

Configuration

The configuration consists of different steps to be taken before Intune can be successfully implemented which include the following:

Start with Intune

  • Create Azure AD group
  • Add licenses
  • Activate Intune
  • Setup DNS settings
  • Activate Company Portal

Configuration and compliance settings

  • Configure enrollment restrictions
  • Setup device compliance policy settings
  • Configure device compliance policy – Windows 10
  • Create notification template
  • Create conditional access policy
  • Join Azure AD

A detailed overview of the different configuration steps is presented below.

Start with Intune

Create Azure AD Group

Since the configuration of Intune will be assigned to employees in the company, a group must be created. Start by creating an Azure AD Group that is used for the Mobile Device Management Configuration. Open the Azure Portal -> Azure Active Directory -> Groups -> New Group. Select the group type “Security”, group name: “Intune Device Management”, membership type: “Assigned”. Click on “Create” to create the group. This is illustrated in figure 2.

Figure 2. Create new Azure AD Group.

Add Licenses

It is of importance that every user in the Azure AD group is equipped with the correct license. When implementing Intune, the Enterprise Mobility + Security E3 (EMS-E3) should be used. A dynamic group licensing is used to facilitate that all users within the Azure AD group are automatically assigned with the correct license.

To implement this, open the Azure Portal -> Azure Active Directory -> Licenses -> All products -> Enterprise Mobility +Security E3 (figure 3)-> Licensed groups -> Assign (figure 4).

Select under Users and groups the “Intune – Device Management” group. Turn the preferred features On or Off under the “Assignment options”and save your settings (figure 5).

Figure 3. Create license group for Intune (EMS-E3).

Figure 4. Assign Azure AD group to the EMS-E3 license.

Figure 5. Turn on/off EMS-E3 license features.

Activate Intune

In a next step, it should be determined whether the required configuration is in place regarding to the URL’s and the Azure AD groups. To do this open the Azure Portal -> Azure Active Directory -> Mobility (MDM and MAM) -> Microsoft Intune. Attach under both the “MDM user scope” and the “MAM User scope” the created group (figure 6) and save these settings.

Figure 6. Configure Intune URL’s.

Activating Intune, it is required to choose an MDM Authority. The MDM Authority is the authority that will be used for managing mobile devices. To activate Intune, open the Azure Portal -> Intune and select Intune MDM Authority” (figure 7).

Figure 7. Choose the MDM Authority.

Setup DNS Settings

Make sure that the DNS settings, Enterprise registration and Enterprise enrollment, are set in Office 365 and at the external DNS provider. Navigate to portal.office.com -> Setup -> Domains and select the required domain. Next, click on “DNS Management” settings correspond to the settings shown in figure 8.

Figure 8. DNS management settings in Office 365.

Important! Manage.microsoft.com is being deprecated in February 2017. Therefore, make sure that the address refers to the correct CNAME in DNS, otherwise enrolling Windows devices will not work.

In the external DNS the record must match the one presented below:

Old: enterpriseenrollment.manage.microsoft.com
New: enterpriseenrollment-s.manage.microsoft.com

Note: The DNS setting will not be visible in the Office 365 portal.

For more information please see the following URL: https://docs.microsoft.com/en-us/sccm/mdm/deploy-use/enroll-hybrid-windows

Activate Company Portal

The Company Portal can be accessed from a mobile device or PC. This portal can be used to make the device compliant to the company’s security policy and to make apps and applications available to the employees.

To configure the Company Portal branding, open the Azure Portal -> Intune -> Client Apps -> Company Portal Branding and provide the company’s name and optional support information (figure 9).

Figure 9. Configure the Intune Company Portal branding.

To make applications available in the Company Portal, the Microsoft Store for Business needs to be configured and activated. Open the Azure Portal -> Intune -> Client Apps -> Microsoft Store for Business, navigate to Manage -> Settings -> Distribute -> “Activate” (figure 10).

Figure 10. Activate the Intune Company Portal.

The configuration can be checked in the Azure Portal -> Intune -> Client Apps -> Microsoft Store for Business. Now it can be determined if the status becomes “Active”, and the required applications can be selected from the Microsoft Store for Business via the “Search” functionality (figure 11).

Figure 11. Adding client apps to the Intune Company Portal.

Don’t forget to synchronize the apps once these apps are added to the Company Portal, otherwise the apps will not be visible in the “App install status” overview. Next, open the Azure Portal -> Intune -> Client Apps -> Microsoft Store for Business -> “Sync” (figure 12).

Figure 12. Synchronize the Microsoft Store for Business apps.

Navigating to the Azure Portal -> Intune -> Client Apps -> App install status a list will be available of all the apps that can be made available to the employees.

Figure 13. Overview of the available apps.

Configuration and compliance settings

Configure enrollment restrictions

In the enrollment restrictions configuration, it can be indicated which platforms will be supported from Intune by allowing or blocking them. It is also possible to indicate from which OS version a device can be enrolled. For the fictional scenario, these settings were kept at default. The configuration can be found under the Azure Portal -> Intune -> Device enrollment-> Enrollment restrictions -> Device Type Restrictions -> Default -> Properties (figure 14, 15 and 16).

Figure 14. Configure the enrollment restrictions.

Figure 15. Enrollment restrictions – select platforms.

Figure 16. Enrollment restrictions – configure platforms.

In the device limit restrictions settings, it is possible to configure a maximum number of devices a employee can enroll. In this fictional scenario this setting is kept on 5 devices. To configure this, open the Azure Portal -> Intune -> Device Enrollment-> Enrollment restrictions -> Device Limit Restrictions -> Default -> Properties (figure 17 and 18).

Figure 17. Device limit restrictions.

Figure 18. Specify the maximum number of devices a user can enroll.

Setup device compliance policy settings

Before starting with the device compliancy policy, first the compliance policy settings need to be setup. Configuring these settings allows to create a Built-in Device Compliance Policy that monitors a device according to the settings displayed in figure 19. Open the Azure Portal -> Intune -> Device Compliance-> Compliance policy settings.

Figure 19. Device Compliance policy settings.

Configure device compliance Policy – Windows 10

Device compliance policies are used to ensure that the device which is used to access company data is compliant to the company security policy. If the device does not comply to this policy, access to company data can be prevented.

On the Windows devices the policy is configured in such a way that access from a non-bit locker device is not allowed. Several security settings can be configured, such as secure boot, require a user to enable the firewall, antivirus and antimalware. Please keep in mind that there is a possibility that not all the security settings are applicable to the employees. Thus, make sure not to prevent users from working at all…:(

To configure the compliancy policy on Windows devices, start by opening the Azure Portal -> Intune -> Device Compliance-> Policies -> Create Policy (figure 20).

Figure 20. Create Device Compliance Policy.

In the Device Health configuration, configure the settings as shown in figure 21. If it is applicable to the devices in the organization, also other settings like “Require Secure Boot” can be configured.

Figure 21. Device Compliance Policy – Device Health.

In this fictional scenario, functionalities such as Device Properties, Configuration Manager Compliance and Windows Defender ATP are not used. This does not mean that these functionalities cannot be of value to use, these settings are very dependent on the company and require Advanced Threat Protection (ATP) licenses. Go to System Security and configure the “Password, Encryption” and “Device Security” as shown in figure 22.

Figure 22. Device Compliance Policy – System Security.

Create Notification Template

In the next step, the notifications that will be sent to the employee are setup. This can be done under “Action for noncompliance”. However, first the notification templates need to be created. For now, save the settings and navigate to Azure Portal -> Intune -> Device Compliance-> Notifications -> Create notification.

Figure 23. Create notification template.

The notification message can be customized with the company logo etc. (figure 24).

Figure 24. Create notification message.

To attach the notification template to the device compliancy policy, go to Azure Portal -> Intune -> Device Compliance-> Policies. Select the created Windows Policy and click on Properties -> Actions for noncompliance -> Add (figure25). Choose the message template and the recipients. It is of importance to configure these actions in the following order: when an employee’s device is not compliant 1) send an email message indicating that a compliant device is required and 2) after for example three days another email has to be send that the device will be directly marked as non-compliant. This provides the employee the possibility to make the device compliant (figure 26).

Figure 25. Attach notification template for noncompliance.

Figure 26. Actions for sending notifications for noncompliance.

Next, the device compliance policy needs to be assigned to the correct Azure AD Group (figure 27).

Figure 27. Assign device compliance policy to Azure AD Group.

Add conditional access policy

Conditional access policies will be used to control if devices and apps are granted access to company data such as email. In the fictional scenario a device must be compliant to the conditional access policy before granting access to company data.

In the Device compliance policy, a few settings are configured to which the device must comply before access to company resources is provided. An example of a setting to which the device should comply is that the device must have Bitlocker enabled. In the conditional access policy, it is indicated that the device may access company data, but only if it meets the device compliance configuration. To do so go the Azure Portal -> Intune -> Conditional Access -> New Policy (figure 28).

Figure 28. Create new conditional access policy.

Now go to Users and groups and click on Select Users and Groups -> Users and Groups and select the Azure AD Group to which this policy applies. In this case no groups are excluded (figure 29).

Figure 29. Conditional access policy – select users and groups.

In this scenario all cloud applications are included. In addition, no exclusions were configured. Go to Cloud Aps -> Include and click on “All cloud apps.

Figure 30. Conditional access policy – Select cloud apps.

This conditional access policy will be applied to a specific platform namely Windows. Open the Conditions -> Device platforms, click configure Yes, followed by “Select device platform” and include only “Windows” (no exclusions were made).

Figure 31. Conditional Access Policy – Conditions – Device Platforms.

In this case no Locations and Device state are configured. Under the Client apps select the client apps to which the policy should apply to as shown in figure 32.

Figure 32. Conditional access policy – conditions – client apps.

Only compliant Windows 10 devices can get access to company data, so under Access Controls -> Grant select “Grant access” and select “Require device to be marked as compliant”. This means that the device must be Intune compliant. If the device is non-compliant, the user will be prompted to make the device compliant. Save the configuration and do not forget to enable the policy!

Figure 33. Conditional access policy – grant – grant access.

Join Azure AD

The configuration is done and now it is almost time to test the result. However, first the Windows 10 client needs to be joined to Azure AD. There are a few different ways to join PC’s to Azure AD.

The preferred method to connect the device to Azure AD is to perform a reset of the device. To do this, go to the client and open Start menu -> Settings -> Update & Security -> Recovery -> Get Started. Two options are visible “Keep my files (Removes apps and settings, but keeps personal files)” and “Remove everything (Removes all personal files, apps and settings)”. Choose “Remove everything”. Next, select “Just remove my files” to avoid that the complete drive will be erased which might take a couple of hours.

The alternative approach does not require to reset the PC. Joining the device to Azure AD can be done by simply registering the device with the company email address. This can be done through the following steps: Start menu -> Settings -> Accounts -> Access work or school -> Connect.

After performing one of the two approaches described above to connect the device to Azure AD, the result as shown in figure 34 will be obtained. Now the device is Azure AD joined and manageable from Intune.

Figure 34. Join Windows 10 device to Azure AD.

In addition, it is now possible to check whether the Company Portal is appearing in the Start menu. Doing so, it can be determined if the device is correctly managed by the company and the available apps are displayed as shown in figure 35.

Figure 35. Company Portal and apps status overview.

The result: accessing company data

In short, a lot of different configuration has been done. First, Intune was setup in Azure. Subsequently, the correct licenses were added, and the company portal was activated. Moreover, the configuration of the following has been done: enrollment restrictions, device compliance, device compliance policies, conditional access policies for Windows 10, joined Windows 10 device to Azure AD.

All these configuration steps will ultimately result in denying or granting access to company data when an employee is trying to get hold of these data by using, respectively, a non-compliant or compliant device.

Figure 36 shows the message one will receive when opening Outlook on a Windows 10 device that does not meet the conditional access policy. When opening the company portal, the employee will see that the respective device is not allowed to access company resources because Bitlocker is not enabled on the device.

Figure 36. Message when accessing Outlook on a non-compliant Windows 10 device.

After enabling Bitlocker the employee will be able to access company data. When checking the Company Portal, it can be seen that the device is compliant to the conditional access policy. Moreover, access to company resources such as Outlook is permitted. To see the difference between the message for a non-compliant and compliant Windows 10 device, please refer to figure 37.

Figure 37. Message when accessing data on a non-compliant Windows 10 device (left) and on a compliant Windows 10 device (right).

As indicated in the beginning of this blog, in the next two blog posts I will describe the steps required for the configuration of Intune on Apple and Android devices, including conditional access.