Block downloads with Cloud App Security and Conditional Access

Microsoft Cloud App Security (MCAS) has the capability to monitor user activity, manage cloud applications, detect suspicious activity, discover shadow-IT and force security and compliance policies for Microsoft and non-Microsoft applications. In this blog post my focus is mainly on the policies to control data exfiltration from an IT-environment. It is described how to prevent downloading company data when working on unmanaged devices.

Of course, it is preferred that users work on managed, compliant devices at all times, enabling them to have full access to the company applications and Office365 functionalities. In this scenario a situation is described in which users work via non-compliant, unmanaged devices and as a result those users can only access Office 365 applications via a browser session, but downloads from OneDrive, SharePoint, Teams and downloading attachments from emails will be blocked. In this setup Cloud App Security and Conditional Access is used for configuring the policy that defines how to control browser sessions.

Pre-requisites

In order to configure MCAS make sure that the correct permissions and licenses are in place:

  • Global Administrator or a Security Administrator
  • Enterprise Mobility + Security E5

Connected Apps

First connect the application that requires configuration in order to get control, visibility and receive access to the investigate activities. Please follow the steps below to do so:

  • Access to the Cloud App Security portal goes through: https://portal.cloudappsecurity.com
  • From the settings menu open “App connectors” and via the blue plus icon, select the right application, in this case “Office 365“, see (figure 1)
  • Perform the steps in the wizard to connect the app successfully

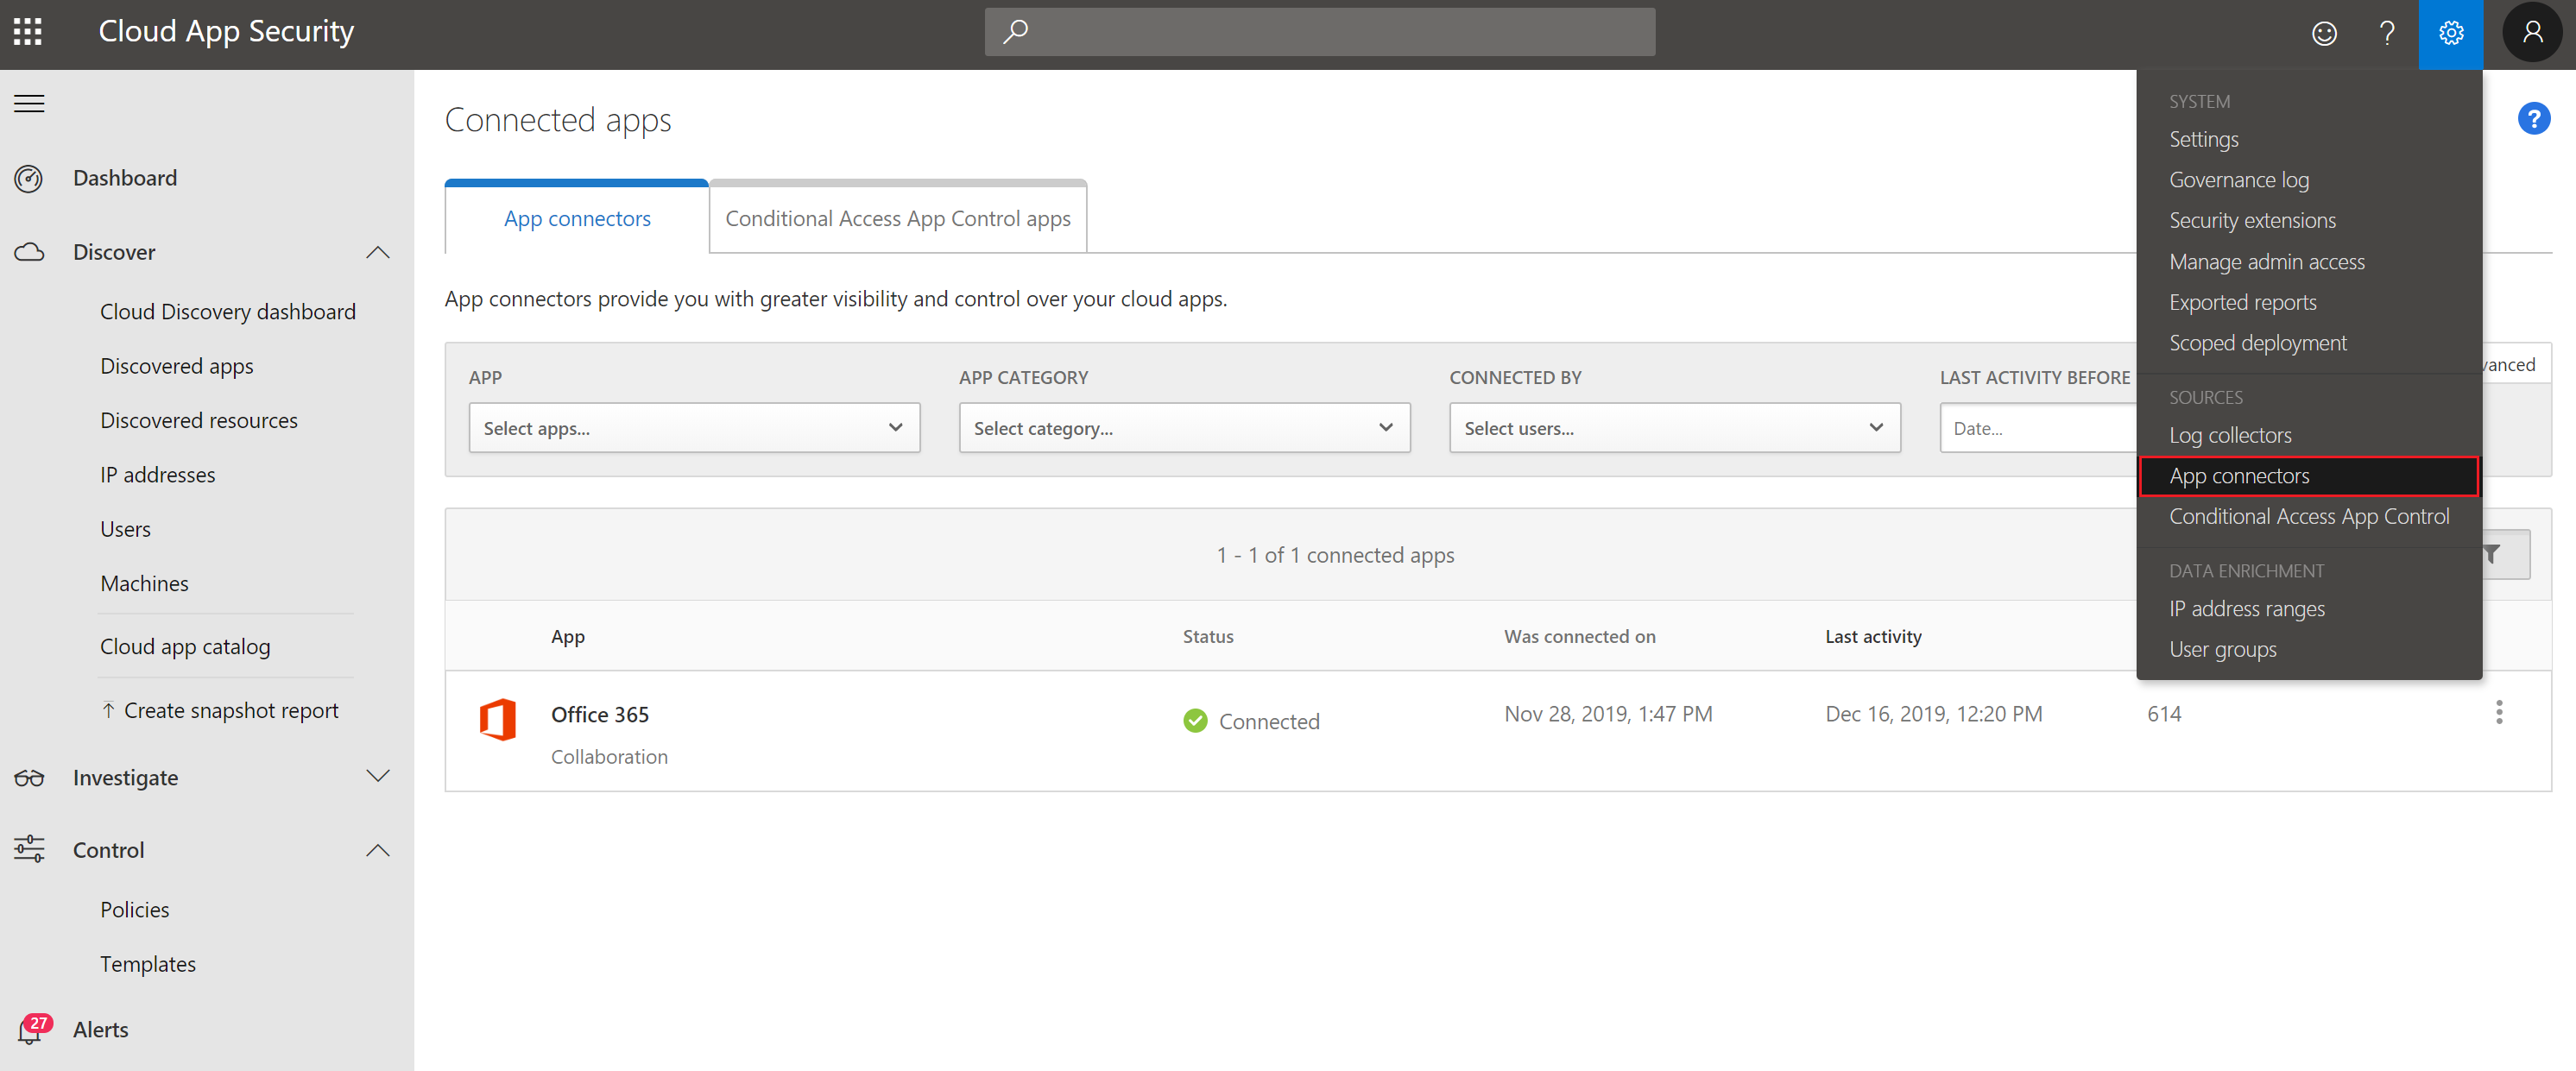
Figure 1. App connectors from the MCAS dashboard.

Create Cloud App Security policies

Second, policies need to be created to control alerts and actions, in order to configure the blocked download policy. This can be done as follows:

On the left, click Control -> Policies (figure 2)

Figure 2. Create policies.

Click on Create policy -> Session Policy (session control applies to browser-based apps, figure 3)

Figure 3. Create Session Policy.

In the Create Session Policy window select the following settings as shown in figure 4:

  • Policy template: No Template
  • Policy name: Block browser download unmanaged devices
  • Description: (can leave blank)
  • Policy severity: Low
  • Category: DLP
  • Session control type: Control file download (with DLP)
  • Activity source: DeviceTagdoes not equalcompliantdomain joined
  • Actions: Block (feel free to type a customize message)

If desired, one can also send an alert via email or Flow when the policy is active. Don’t forget to save the policy.

Figure 4. Create cloud app security session policy.

Create Conditional Access policies

Third a Conditional Access policy can be determined in Intune indicating to which users the policy must be applied and under which conditions.

Figure 5. Create Conditional Access Policy in Intune.

Give the policy a name for example “Block browser download unmanaged devices”. Next, assign the users and/or groups to which the policy applies, as shown in figure 6.

Figure 6. Assign users and/or groups to the policy.

Now the Cloud apps and actions can be configured. In this case the policy should be active on Office 365 Exchange Online and Office 365 SharePoint Online (figure 7).

Figure 7. Configure cloud apps or actions.

Note: When SharePoint Online is chosen in the Conditional Access policy, this not only applies to SharePoint Online and OneDrive, but also to Teams, Plans, Delve, MyAnalytics and Newsfeed.

Under Conditions select at Device Platform -> Any Device (figure 8) and under Locations -> Any location (figure 9). In the Device state under Include -> select All device state and check the following boxes under Exclude -> Device Hybrid Azure AD joined, and Device marked as compliant (figure 10 & 11).

Figure 8. Configure conditions.

Figure 9. Configure locations.

Figure 10. Configure device state (include).

Figure 11. Configure device state (exclude).

As described, a Cloud App Security policy is now configured for blocking downloads from browser sessions on unmanaged devices. Next, the Session controls will be configured, so Conditional Access is aware of the policy. To do so, check the box Use Conditional Access App Control and select Use custom policy… (figure 12).

Figure 12. Configure session policy.

Enable and save the policy!

End-user Experience

When a user opens https://portal.office.com from an unmanaged device and then opens Outlook, a notification is received by the user that Exchange Online is monitored (figure 13). When the user chooses to continue, the mailbox opens, and if the user subsequently wants to download attachments from emails in Outlook, a notification will be shown that the device is not secure as displayed in figure 14. The same will be observed when downloading documents from OneDrive (figure 15 & 16).

Figure 13. Notification that access to Microsoft Exchange Online is monitored.

Figure 14. User notification when downloading attachments in OWA.

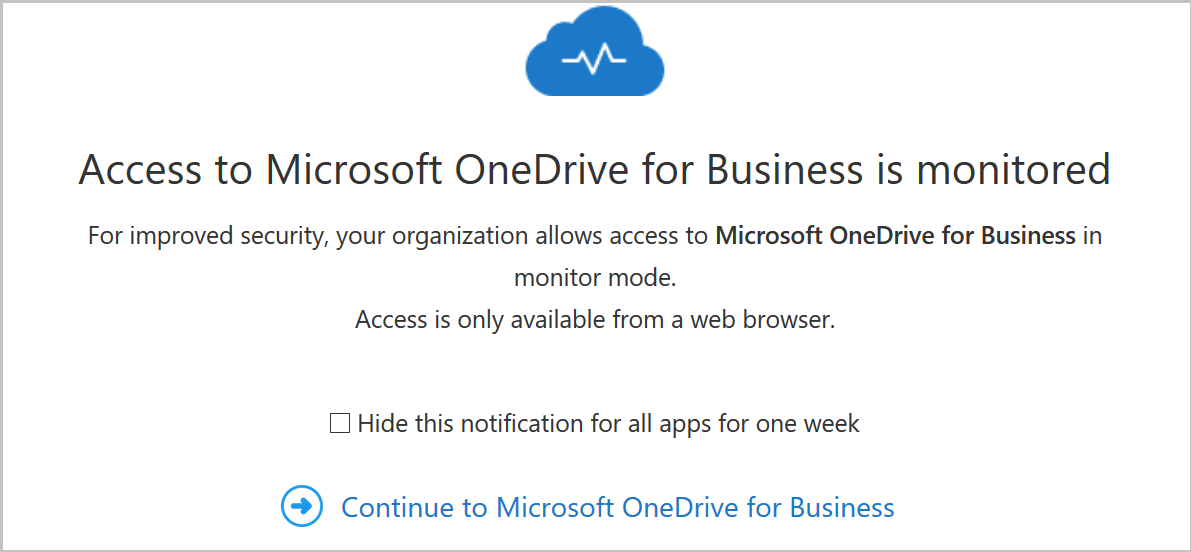
Figure 15. Notification that access to Microsoft OneDrive for Business is monitored.

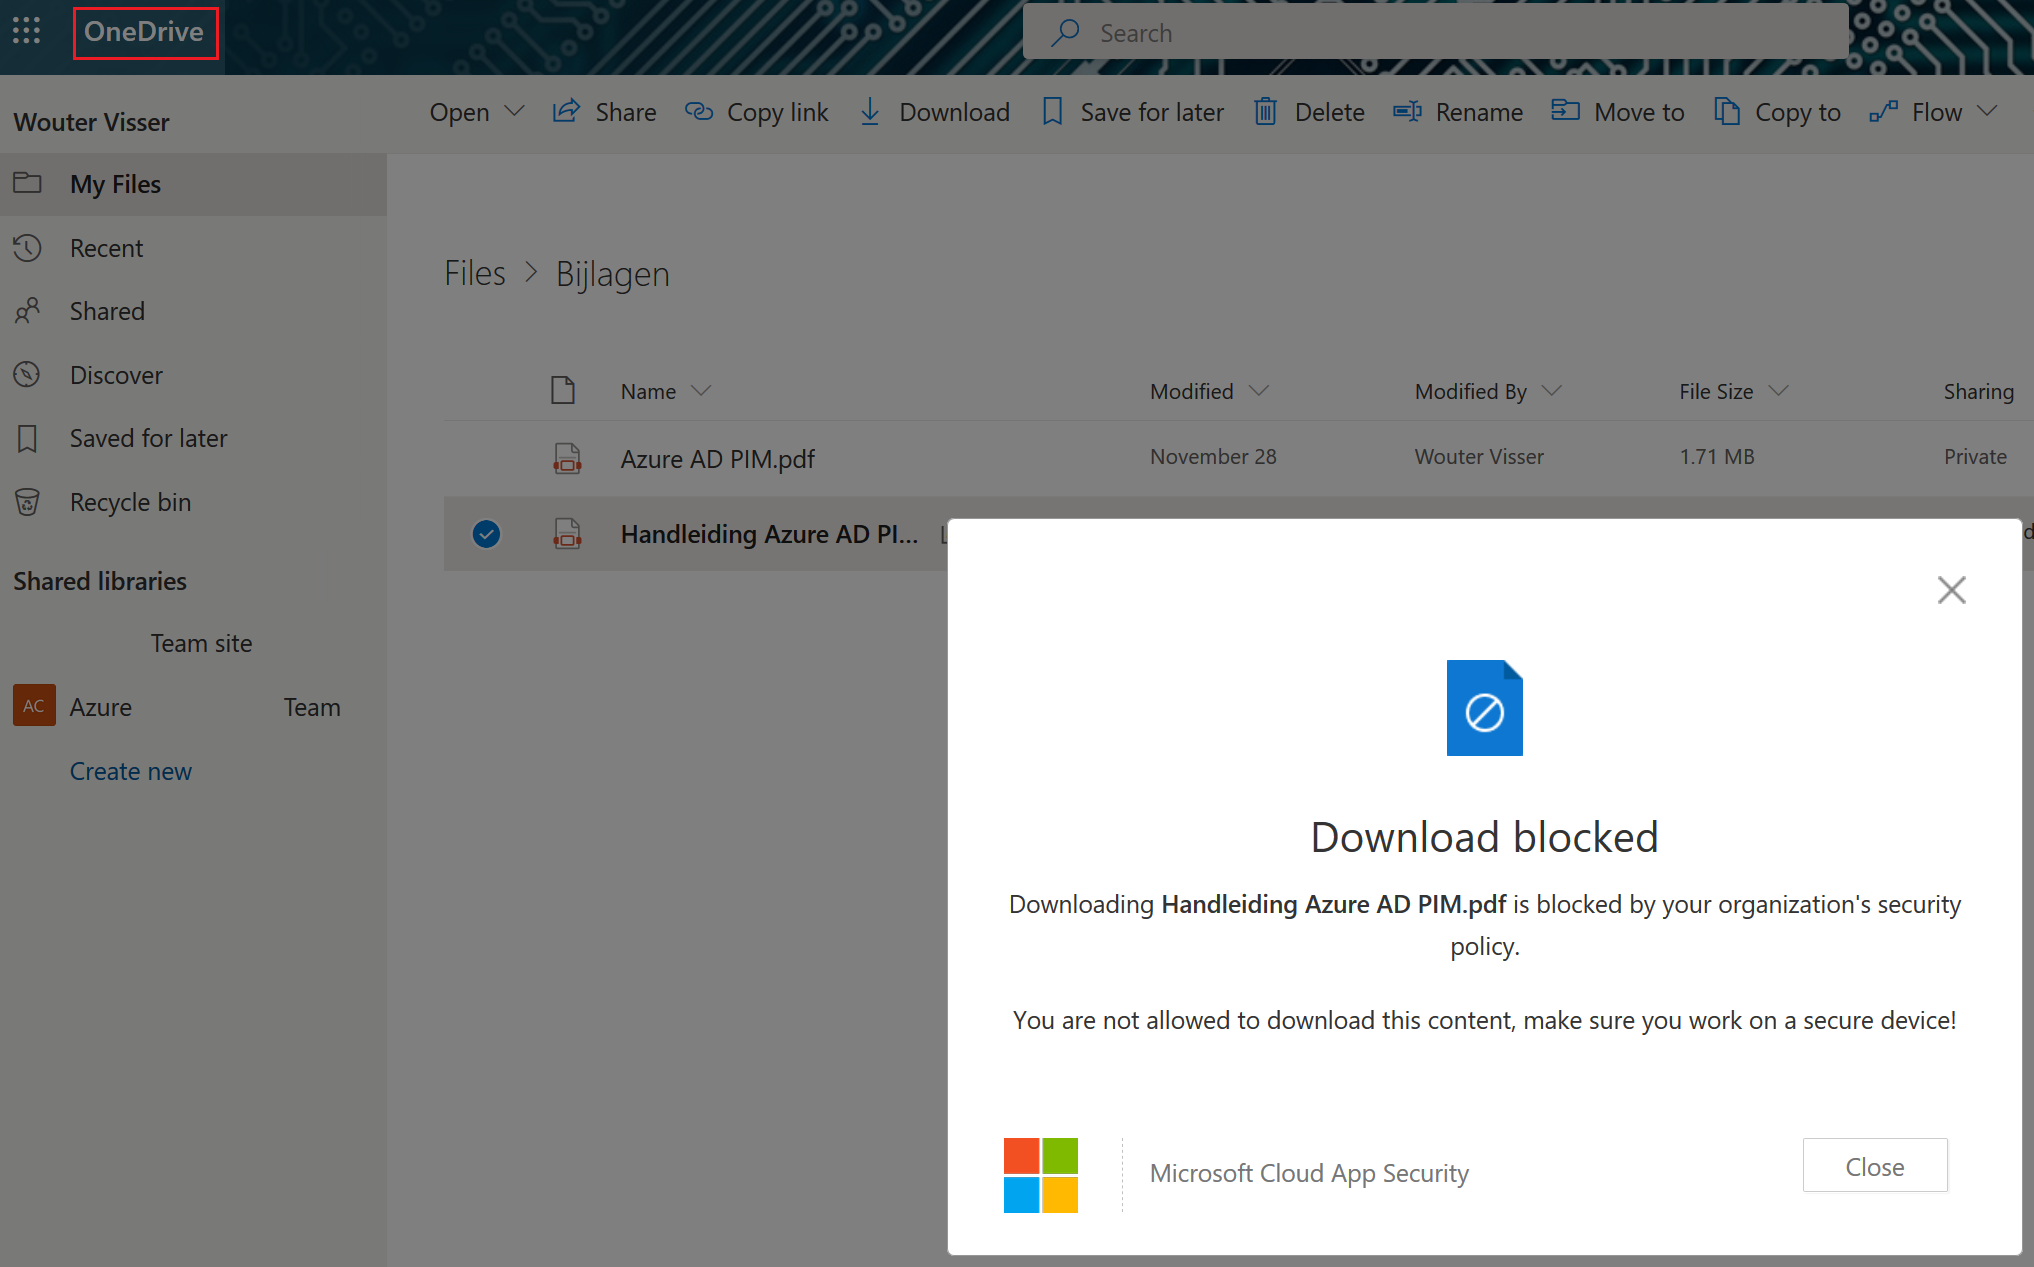
Figure 16. User notification when downloading attachments from OneDrive.

As soon as users go to SharePoint Online, OneDrive, Teams, Plans, Delve, MyAnalytics and Newsfeed via an unmanaged device, traffic is redirected and monitored via Cloud App Security. Subsequently, alerts appear in the Cloud App Security portal under the Alerts pane if an event occurs, so that an investigation can be started as displayed in figure 17.

Figure 17. Cloud App Security – Alerts.

Good luck securing company data!

Remove Azure Information Protection Labels

Once you work with Azure Information Protection (AIP) labels, you may want to remove some labels you created during configuration and testing. After deleting these labels in the interface, the deleted labels will be displayed under ‘Protection Templates’, see figure 1.

Figure 1. Azure Information Protection label overview.

It is not possible to completely remove these labels via the interface. However, it is possible to remove these labels with PowerShell, please see below the used commands and figure 2 for an overview:

  1. Start PowerShell as an administrator.
  2. Create a connection to your subscription Connect-MsolService
  3. Connect to the Azure AD Rights Management service Connect-AadrmService
  4. Retrieve the AIP label ID Home -> Azure Information Protection – Labels > Label (at the bottom you will see the ID).
  5. Remove the label (template) Remove-AadrmTemplate -TemplateId <template_Id_from step_4> and press “Enter”. Now the label is removed.

Figure 2. Remove Azure Information Protection labels with PowerShell.


Protect your data with Azure Information Protection

Data protection should always get priority and must be on top of mind in organizations that store and transfer sensitive data. Especially in these days, when it’s more important than ever before to protect data. Also, after May 25th, 2018 organizations needs to be compliant and must follow the standards of the General Data Protection Regulation law (GDPR). Microsoft Azure Information Protection can contribute to this. So, it’s no surprise that the last few weeks customers ask me more often the questions what is Azure Information Protection and what can it do for our organization? Therefore, I will provide more information about the capabilities of Azure Information Protection in this blog post.

Azure Information Protection

Azure Information Protection (AIP) is a Microsoft solution that has the capabilities to define how to classify, store and transfer data. AIP will be applied on top of Azure Rights Management and has an integration for documents and e-mails. For example: if an employee of the financial department wants to send a document or e-mail containing sensitive information, AIP can be used to classify the document or e-mail. Depending on the classification, colleagues or external parties can or can’t access the document and/or e-mail message. It is also possible to see when and where documents are opened, and it is even possible to revoke the access from documents. Very high classified e-mails can also be prevented from being forwarded or to copy its content. Thus, AIP enables the classification and protection of data. Figure 1 shows the data classification labels configuration in Azure and figure 2 and 3 show an example of the labels in Outlook and Word, respectively.

Figure 1. Classification labels configuration in Azure.

Figure 2. Classification labels in Outlook.

Figure 3. Classification labels in Word.

Protect files and folders

Using AIP, it is also possible to apply classification labels on other files such as PDF’s. When right clicking on a PDF file the option “Classify and protect” will become visible, please see figure 4. It is also possible to select multiple files and/or folders and to track and revoke files.

Figure 4. Classify and protect other files and folders.

Encryption

Because AIP is on top of Azure Rights Management, encryption of both documents and e-mails is possible. When a high classified label is configured with protection and this label is applied to a document, the document will be automatically encrypted. This encryption prevents access from unauthorized users. Figure 5 shows on the left a Word document on which a high classification label with encryption is applied. On the right a Word document is presented on which a low classification, without encryption is applied. As can be seen in figure 5, this document is displayed as an “Encrypted Package”.

Figure 5. On the left a Word document incl. high classification and encryption, on the right the same document without encryption.

Licenses

Microsoft offers licenses depending on the functionalities that are needed. When using Azure Active Directory Premium P1, the user will have to apply data classification manually, while Azure Active Directory Premium P2 can do this automatically. Please refer to the following URL to see which license models are available: https://azure.microsoft.com/en-us/pricing/details/information-protection/

In the upcoming posts I will describe how to configure classification labels in Azure, what the prerequisites are for the AIP client, how to configure and apply transport rules and the possibilities of data loss prevention (DLP).

Create a Site-to-Site VPN with Azure Resource Manager

Introduction

Site-to-site Virtual Private Network (VPN) is used to establish connections between different locations of companies, amongst others. This way the different locations can exchange data with each other through a secure connection. In Azure, Site-to-Site VPN is used to establish connections between the Azure tenant and the on-premises environment. Making use of the Site-to-Site VPN connection it is possible to create one large network. This is called a hybrid environment.

Before creating a site-to-site VPN make sure that the VPN endpoint device will support the connection with Azure and a that public IPv4 IP address is available. To check if the VPN device is supported, please see the following website: https://azure.microsoft.com/nl-nl/documentation/articles/vpn-gateway-about-vpn-devices/

This blogpost will focus on Azure Resource Manager portal and contains six steps that should be performed in sequence. Please note that the configuration of the VPN endpoint device located on-premises will not be discussed in this blogpost. The following steps should be taken to create a Site-to-Site VPN in Azure:

  • Step 1. Create a Resource Group.
  • Step 2. Create a Virtual Network in Azure.
  • Step 3. Create a Virtual Network Gateway.
  • Step 4. Create a Local Network Gateway.
  • Step 5. Create a VPN connection.
  • Step 6. Check if the connection is working.

Step 1. Create a Resource Group

Virtual machines, IP addresses, load balancers, virtual network gateways, local network gateways, virtual networks etc. are all components that are usually related and may depend on each other. It is possible to make use of Azure Resource Manager Groups and combine these different components into a single or multiple resource group(s). This will make management and maintenance of these components a lot easier.

In order to create a resource group please login to the Azure portal at https://portal.azure.com. The “resource groups” icon is accessible on the left side of the portal (Figure 1).

Resource groups


Figure 1. Azure resource groups.

When the resource groups are not shown, click on “Browse” and search for resource groups, then mark them as favorite. From this moment on they will appear in the list.

In this example the goal is the create a VPN connection in Azure. First a resource group for the Virtual Network should be created. To do so click on the “Resource groups”, select “Add”, fill out the required fields and select “Create” (Figure 2).

Add Resource group


create button

Figure 2. Create Resource Group ARM.

Step 2. Create a Virtual Network in Azure

The second step is to create a virtual network in Azure. It is very important to determine in advance which subnets will be used. The selected subnet in Azure should not overlap with the subnets used on-premises.

In the Azure portal select “Virtual networks”. Once again if the item is not shown, click on “Browse”, search for virtual networks and mark them as favorite.

Create a virtual network by clicking “Add”. Fill out the required fields and click on “Create” (Figure 3).

Create a virtual network


create button

Figure 3. Create a virtual network.

If desired, it is possible to add multiple subnets, for example one for the front-end servers and one for the back-end servers.

Step 3. Create a Virtual Network Gateway (Azure)

The virtual network gateway is the gateway on the Azure end, so sending and receiving data will go through this gateway. In this step the purpose of the Site-to-Site VPN should be considered. Depending on the requirements a choice can be made between route-based and policy-based VPN types.

  • Route based: (Dynamic routing) will support multiple VPN connections and uses IKEv2.
  • Policy Based: (Static routing) supports a single VPN connection and works with IKEv1.

*When a virtual network gateway is re-created it will come with a new public IP address from Microsoft. Keep in mind to change the (old) IP address in the VPN endpoint device that is used on-premises.

In the Azure portal select “Virtual networks gateways” and click “Add”. Fill out the required fields and click on “Create” (Figure 4).

*Provisioning a virtual network can take up to 45 minutes.

In the next step fill out the information provided below and shown in detail in Figure 4.

  • Virtual network: Select the virtual network that has been created in step 2.
  • Public IP addresses: Select Azure’s public IP address.
  • Gateway type: Select VPN.
  • VPN type: Select Route-based.

Create a virtual network gateway


create button

Figure 4. Create virtual network gateway.

Step 4. Create a Local Network Gateway (on-premises)

The local network gateway is the gateway that will be configured with the details of the on-premises network. The following information must be verified:

  • IP addresses: This must be the IP address of the VPN endpoint device located on-premises.
  • Address space: All the address spaces that’s being used on-premises.

*The address space used on-premises may have absolutely no overlap with the address space in Azure!

In the Azure portal select “Local networks gateways” and click “Add”. Next, fill out the required fields and click on “Create” (Figure 5).

Create a local network gateway


create button

Figure 5. Create local network gateway.

When creating multiple VPN connections, for example to different locations and/or companies, this step should be performed for each connection.

Step 5. Create a VPN connection

Once the local network is created a new connection can be added. This step can be executed directly after the local network gateway has been created. Click on “Connections” and click “Add”. Fill out the required fields and click on “OK” (Figure 6).

In the next step fill out the information provided below and shown in detail in Figure 6.

  • Virtual network gateway: Select the virtual network gateway that was created in step 3.
  • Local network gateway: This option cannot be changed. The VPN connection must be added to the local network gateway that was created in step 4.
  • Shared key (PSK): This key will be used for encryption for the connection. Type in a random mix of letters and numbers (do not use special characters in the key). Make sure that this exact key will be used for the configuration of the VPN connection on-premises.

Add VPN Connection


ok button

Figure 6. Add Connection configuration.

Step 6. Check if the connection is working

The VPN connection needs to be successfully configured in both Azure and the VPN endpoint device on-premises. Once the configuration on both sides is finished, it is possible to check the connection status.

Go to “Local network gateway” and click on the connection. The local network gateway settings will be visible, click on “Connections” and select the connection. The information displayed here is showing the current connection status and data traffic, see Figure 7 for details. It is also possible to see the connection properties of the VPN connection as presented in Figure 8.

To open directly the VPN connections, click on “Browse” in the Azure Portal, search for connections and mark them as favorite.

Connection details 01


Figure 7. VPN Connection details.

Connection details 02


Figure 8. Properties of the configured VPN connection.

If executed all steps as described above, a successful VPN connection between the on-premises environment and the Azure environment has been established.